打造属于自己的搜索引擎(一)

前言

我们上网用得最多的一项服务应该是搜索,都喜欢百度一下或谷歌一下, 那么百度和谷歌是怎样从浩瀚的网络世界中快速找到你想要的信息呢(好奇吧) 这就是搜索引擎的魅力,一个信息检索的领域。

打造搜索引擎的方式

打造搜索引擎有几种方式,介绍我了解过的两种

  • 基于jieba、scrapy、whoosh、django
  • 基于es+django+scrapy+redis打造的搜索引擎
  • 个人认为第一种比较难。额,具体怎么做呢网上都有例子,嘿嘿......

    搜索引擎的几个要点:

    1. 一个强大的爬虫(数据库)资源和服务器支持
    2. 分词(jieba)、索引(whoosh)。这里用的是es是企业级的搜索引擎集合了分词和索引;许多大厂都在用比如github、facebook等
    3. 数据的展示和接入(这里用的是django)

    第一步,爬虫的准备工作

    这里是用scrapy的框架进行爬取的,scrapy的安装只需pip install scrapy(只需要你安装好Python→_→) 创建项目:scrapy statproject "你的项目名" scrapy genspider "爬虫名" "爬取目标网站的域名"

    额……具体怎么爬就不说了,接下来介绍踩的坑:

    1、settings的设置
    2、缩进问题,Python对这个很严谨,然后因为scrapy是对多个文件的操作。。。如果你在某个需要缩进的没有缩进,而那个刚好在一个函数下面→_→就没那么好搞了特别是一段的时候(虽然会报错定位到哪一行)

    以下是我爬取思否的源代码:

    1
    2
    3
    4
    5
    6
    7
    8
    9
    10
    11
    12
    13
    14
    15
    16
    17
    18
    19
    20
    21
    22
    23
    24
    25
    26
    27
    28
    29
    30
    31
    32
    33
    34
    35
    36
    37
    38
    39
    40
    41
    42
    43
    44
    45
    46
    47
    48
    49
    50
    51
    52
    53
    54
    55
    56
    57
    58
    59
    60
    61
    62
    63
    64
    65
    66
    67
    68
    69
    70
    71
    72
    73
    74
    75
    76
    77
    78
    79
    80
    81
    82
    83
    84
    85
    86
    87
    88
    89
    90
    91
    92
    93
    94
    95
    96
    97
    98
    99
    100
    101
    102
    # -*- coding: utf-8 -*-
    import scrapy
    from ..items import AritcleItem
    from ..utils.common import get_md5
    from datetime import datetime, timedelta
    import re
    from scrapy.http import Request
    from urllib import parse
    import datetime
    from scrapy.loader import ItemLoader
    import requests
    from selenium import webdriver
    from scrapy.xlib.pydispatch import dispatcher
    from scrapy import signals
    class SegmentfaultSpider(scrapy.Spider):
    name = 'segmentfault'
    allowed_domains = ['segmentfault.com']
    start_urls = ['https://segmentfault.com/blogs']
    custom_settings = {
    "COOKIES_ENABLED": True,

    }
    #动态网页
    # def __init__(self):
    # self.browser = webdriver.Chrome()
    # super(SegmentfaultSpider,self).__init__()
    # dispatcher.connect(self.spider_close,signals.spider_closed)
    # def spider_close(self,spider):
    # print("spider closed")
    # self.browser.quit()
    # 2、获取文章列表的文章url交给解析函数
    def parse(self, response):
    #print(response.request.headers["User-Agent"])
    post_nodes = response.css('div.summary a')
    # print(post_nodes)
    for post_node in post_nodes:
    #post_url = 'https://segmentfault.com'+ post_url

    post_url = post_node.css("[href^='/a/']::attr(href)").extract_first("")
    #print(post_url)
    post_url=post_url = 'https://segmentfault.com' + post_url
    yield Request(url=post_url, callback=self.parse_detail)

    # 1、获取下一页的url并交给scrapy下载解析
    next_urls = response.css(".next.page-item a::attr(href)").extract_first("")
    #print(next_urls)

    if next_urls:
    #print('----------------------------------------------------------------------------------------------')
    next_urls = 'https://segmentfault.com' + next_urls
    yield Request(url=next_urls, callback=self.parse)
    #print(post_url)
    #解析
    def parse_detail(self, response):


    article_item = AritcleItem()
    # 作者头像
    #image_url = post_node.css('img::attr(src)').extract_first("").strip()
    #root div.d-flex.align-items-center.mb-4 a picture img
    author_img_url = response.css('#root div.d-flex.align-items-center.mb-4 a picture img::attr(src) ').extract()
    print('******************************************************************************************************')

    #print(author_img_url)
    print('******************************************************************************************************')

    title = response.xpath('//div/h1/a/text()').extract()[0]
    time = response.css("div.font-size-14 time::attr(datetime)").extract()[0]
    time = time.replace('T', ' ').replace('+', ' ')
    content = response.xpath('//div/article').extract()[0]
    author_name = response.xpath('//*[@id="root"]/div[4]/div[1]/div[1]/div[2]/div/div[1]/a/strong/text()').extract_first()
    #print('******************************************************************************************************')

    article_item["url_object_id"] = get_md5(response.url)
    article_item["title"] = title
    article_item["url"] = response.url
    article_item["author_img_url"] = author_img_url
    try:
    time = datetime.datetime.strptime(time, "%Y/%m/%d").date()

    except Exception as e:
    time = datetime.datetime.now().date()

    article_item["time"] = time
    article_item["author_name"] = author_name
    article_item["content"] = content


    #通过item_loader加载item
    # item_loader = ItemLoader(item =AritcleItem(),response=response)
    # item_loader.add_css("author_img_url", "#root div.d-flex.align-items-center.mb-4 a picture img::attr(src)")
    # item_loader.add_css("time", "div.font-size-14 time::attr(datetime)")
    # item_loader.add_xpath("title", "//div/h1/a/text()")
    # item_loader.add_value("url",response.url)
    # item_loader.add_value("url_object_id", get_md5(response.url))
    # item_loader.add_xpath("content", "//div/article")
    # item_loader.add_xpath("author_name", "//*[@id='root']/div[4]/div[1]/div[1]/div[2]/div/div[1]/a/strong/text()")

    yield article_item


    二、es的介绍及应用

    es讲真我也不算是很了解但是在打造引擎所用到的倒是还是有多了解的。 es在打造引擎扮演的角色中你可以把它当做一个数据库、可以是一个强大分词和索引。接下来也是应用这几个功能来说明。

    es的下载安装:es下载

    这里有两个我踩过的坑,得注意一下

    1. 提示 python.lang.ClassNotFoundException,在包里有个lang.py的文件删掉它
    2. 得用管理员权限运行es

    对了,还有一个跟es的搭配的可视化es-head下载

    重点来了

    在存入es中的时候,需要设置每个字段的类型(具体可以看看一些博客,或者官方文档,还挺简单理解的),所以需要在项目目录下创建一个modes文件夹该文件下创建es_type.py如图:
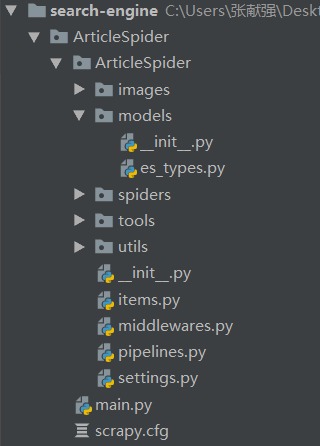
    源代码如下:

    es_types

    1
    2
    3
    4
    5
    6
    7
    8
    9
    10
    11
    12
    13
    14
    15
    16
    17
    18
    19
    20
    21
    22
    23
    24
    25
    26
    27
    28
    29
    30
    31
    32
    from datetime import datetime
    from elasticsearch_dsl import DocType, Date, Nested, Boolean, \
    analyzer, InnerObjectWrapper, Completion, Keyword, Text

    from elasticsearch_dsl.analysis import CustomAnalyzer as _CustomAnalyzer

    from elasticsearch_dsl.connections import connections
    connections.create_connection(hosts=['localhost'])
    class CustomAnalyzer(_CustomAnalyzer):
    def get_analysis_definition(self):
    return {}

    ik_analyzer = CustomAnalyzer("ik_max_word", filter = ["lowercase"])
    class ArticleType(DocType):
    suggest = Completion(analyzer=ik_analyzer)
    title = Text(analyzer="ik_max_word")
    author_name = Text(analyzer="ik_max_word")
    time = Date()
    url = Keyword()
    url_object_id = Keyword()
    author_img_url = Keyword()
    author_img_path = Keyword()
    content = Text(analyzer="ik_max_word")


    class Meta:
    index = "segmentfault"
    doc_type = "article"

    if __name__ == "__main__":
    ArticleType.init()

    items

    1
    2
    3
    4
    5
    6
    7
    8
    9
    10
    11
    12
    13
    14
    15
    16
    17
    18
    19
    20
    21
    22
    23
    24
    25
    26
    27
    28
    29
    30
    31
    32
    33
    34
    35
    36
    import datetime
    import scrapy
    from scrapy.loader import ItemLoader
    from .settings import SQL_DATETIME_FORMAT,SQL_DATE_FORMAT
    from scrapy.loader import ItemLoader
    from scrapy.loader.processors import TakeFirst, MapCompose, Join
    from w3lib.html import remove_tags
    from .models.es_types import ArticleType
    from elasticsearch_dsl.connections import connections
    import redis
    class AritcleItem(scrapy.Item):
    title = scrapy.Field()
    author_name = scrapy.Field()
    time = scrapy.Field()
    url = scrapy.Field()
    author_img_url = scrapy.Field()
    content = scrapy.Field()
    url_object_id = scrapy.Field()
    author_img_path = scrapy.Field()
    def save_to_es(self):
    article = ArticleType()
    article.title = self['title']
    article.author_name = self['author_name']
    article.time = self['time']
    article.url = self['url']
    article.meta.id = self['url_object_id']
    article.author_img_url = self['author_img_url']
    if "author_img_path" in self:
    article.author_img_path = self['author_img_path']
    article.content = remove_tags(self['content'])
    article.suggest = gen_suggests(ArticleType._doc_type.index, ((article.title,10),(article.content,7)))

    article.save()
    redis_cli.incr("pm_count") # redis存储爬虫数量
    return

    pipelines

    1
    2
    3
    4
    5
    6
    7
    class ElasticsearchPipeline(object):
    # 将数据插入es
    def process_item(self, item, spider):
    #将item转换成es的数据
    item.save_to_es()
    return item

    settings

    1
    2
    3
    4
    5
    6
    7
    8
    9
    10
    11
    ITEM_PIPELINES = {
    #'ArticleSpider.pipelines.ArticlespiderPipeline': 300,
    #'scrapy.pipelines.images.ImagesPipeline':300,
    'ArticleSpider.pipelines.ArticleImagePipeline': 1,
    #'ArticleSpider.pipelines.JsonWithPipeline': 2,
    #'ArticleSpider.pipelines.JsonExporterPipeline': 2,
    #'ArticleSpider.pipelines.ArticleMysqlPipeline': 2,
    #'ArticleSpider.pipelines.MyTwistedPipeline': 2,
    'ArticleSpider.pipelines.ElasticsearchPipeline': 2,
    # 'ArticleSpider.pipelines.LagouJobTwistedPipeline': 1,
    }

    到这里就把数据存入了es了,可以通过es-head可视化来查看存入情况

    嗯......这里,我好像也没遇到啥,坑太深的,嗯,就是在es_type.py的编写,一定要严格遵守它的语法就没什么大问题,哦,对了...版本问题一定得注意。(报错的信息,找到错误的准确信息然后复制Google一下多找找一般能找到解决办法)

    这里推荐几个博客

    有关新闻的搜索引擎的
    SduViewWebSpider